Monday, November 28, 2011

Happy Holidays

Another easy Holiday decorating idea, compliments of Pinterest. There is not much of a story line here so Im just going to dive right in:

Materials:
Colored Paper (whatever color scheme you are planning around
Stick On Letters (you can also use stencils)
Exacto Knife (cutting surface) or Scissors
Ruler
Twine, or Natural Wire, or a thicker String or Yarn
Hole Punch

Lets Get Started

Take a scrap sheet of paper and make a template for the size of each flag

 using the template trace out on the flag and then cut out the flag. Repeat this process for however many letters you use in your quote-phrase-word 
Another example would be "Be Mine" compliments to Kailin Murphy Curtin on this idea! 

Break open the letters 
Lay everything out and the stick the letters on 

Once the letters are on tight and secure, punch holes in the top left and right corners of the flag

Thread the twine through the flags 

Happy Holidays

One Mans Trash is another Mans Treasure

In the late summer flea markets were popping up like Starbucks all over the city. I haven't been to one since my Interior Design days, and with the space doubling in size we needed some additional fun pieces that were unique to us and what we could call "finds". We drove up to this huge warehouse and I was like a kid in a candy shop. I seriously think I may have left Chris looking for me at points. However we soon found that it was a dream come true for contracting type jobs not a "shopper". They had a lot of  vintage sinks, ball and claw foot tubs (so cool), crystal roaring 20's style chandeliers, door knobs and stove tops.... you get the idea. It would have been perfect had we been starting from scratch in a vintage style home. As we were getting ready to leave, we started admiring this vintage range top when I noticed this, what looked to be very old window type frame leaning behind the range. We pulled it out and sure enough it looked as though it was a window from a Church or larger structure ranging from the years of 1900-1940's. It was so filthy and dirty that I had to wipe off the dirt to look at the glass in the panes. Thats when we knew.... this was old, with the blown glass panes. I asked the cashier if she knew anything and she knew nothing. Chris was like "really Meg....What are you going to do with that"....Well he was just going to have to wait and see.  So $20 (for the window), a can of paint and a little Old English we now had a new but old unique find to hang in the new place..... And he loves it!!!

Im sorry I dont have the best tutorial on this project, but that is because the pictures were taken before I started this blog.
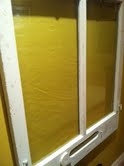
Basically how we found it
We bleached it down, and put painters tape around the window panes

Fresh coat of paint.... it actually needed 2

Once the paint had dried, we began the distressing process
 (please refer to a previous blog "Old to new then Old again")

Close up of the finished product (notice the waves in the glass) in the new home

Finished product.... excuse the Holiday Banner..... That blogs next
stay tuned


Sunday, November 27, 2011

Tis the Season to......

BE MERRY!!!! Now that Thanksgiving has come and gone it is officially the Holiday Season. So to kick off the Holidays we dove right into making the house as festive as possible!!! Its hard not to smile every time you walk in the front door to be greeted with a huge whiff of Christmas tree and to see the mantel covered in balsam twinkling.  This year, I decided to do a lot of the decorations from scratch. I am a huge fan of Pinterest (www.pinterest.com) which is where I get a lot of my ideas. After seeing the "Be Merry" letters hanging from peoples mantels and continuously being reposted, I thought I would give it a shot. The end result..... Easy, Adorable & Cheap!

Materials:
Letters from a Craft Store
Paint
Paint Brush
Glitter Spray
Glue Gun
Ribbon
Tac's


Paint the letters
Let them dry depending on what type of paint you used
Move the dry letters to a clean dry surface that can be thrown away (like a paper bag)
Glitter Spray
Spray the glitter all over the dry letters
Let the glitter dry

Once the glue is ready, start gluing the ribbon to the back of the letters. There should be about 6-8" of ribbon coming off the letter

Once the glue has dried the letters are ready to be hung.

using the tac's hang the letters. 

The fun thing about this project is you can create using any phrase
Enjoy!!!

Sunday, November 20, 2011

Cake Pops..... GENIUS!!!

I am going to start this blog off by saying if you have not had a cake pop you need to Google, Yelp, City Search or whatever it takes to find the nearest Starbucks to get your hands on a piece of heaven in a cake pop. When I first saw these little pieces of heaven I was a little hesitant only because I am not a huge fan of sweets. For one I dont have much of sweet tooth and prefer the saltier side to foods, and for two I don't really care for the calories nor the fat. But after pondering these adorable little treats for no more then 30 seconds I thought..... GENIUS!!!! Just enough to fill that little craving and with little calories and fat attached. I mean, they are just genius.
ADORABLE

Now here's the question... How hard can these little pieces of heaven be to make? The answer: Simple & Fun! And here is how its done.....

Ingredients:
* Betty Crocker Super Moist Cake Mix (any flavor)
* All the ingredients that the cake mix calls for ( Vegetable Oil, 3 Eggs, Water)
* A cake pan
* Frosting
* Popsicle sticks
* Baking sheet
* Almond Bark or Candy Coating
* Sprinkles
* Styrofoam Block (I didn't have this so I used dixi cups)


Step 1: Follow the directions on the cake box as if you were making a cake
Step 1 a. Mix the ingredients together
Step 1 b. Grease the pan
Step 1 c. Pour the cake batter into the pan
Step 1 d. Bake (according to what the box directions)
Step 2: Slice and let cool
Step 3: crumble the cake. I prefer a food processor but this can be done by a masher as well
crumbled 
Step 4: Add half of the tub of the frosting and mix together
Step 5: Take about 1" of the mixture in your hands and form a ball. 
Place the ball on a cookie sheet. Repeat until all of the mixture is gone

Step 6: Put the popsicle sticks in to the center of a ball so that the stick is standing straight up

Step 7: Cover and place in the fridge for 8-12 hours or more. This is the trick to the entire process. DO NOT FREEZE


Step 8: When the pops are ready to come out of the fridge, take the Almond Bark or Candy Coating and heat in the microwave according to the directions on the package. Every product is a little different


Step 9: Take the pop and dip and roll into the coating, making sure that the entire pop is covered
Step 10: Because I didn't have a styrofoam block, I pierced a hole in the base of the dixi cup and placed the pops stick in the hole so that the pop was standing straight up.

Step 11: Sprinkle the pop with sprinkles or any other type of decoration

Step 12: Once dried, cover the pop with a pop bag or saran wrap and then secure with a ribbon 
ENJOY!


Who says microdermabrasion has to cost over $200

So no, this is not the real thing. But it is a DIY version of microdermabrasion. Lets just say I know very little about dermatology other then to always wear sunscreen and to wash my face every night before I go to bed. This little trick is truly fabulous and makes your skin smooth and good as new. Trust me, its pretty great, and only requires 2 ingredients, one of which is free.
Ingredients:

3 tablespoons Baking Soda
1 Tablespoon Water


mix

And that's it!!! So easy!!!

Simply apply to dry skin in a circular motion. Once you have fully applied to your face, using a wet washcloth remove the mixture as you would with any normal face wash. And enjoy!!!