Thursday, October 27, 2011

Old to New.... But then old again

Every room is an on going project. So I am constantly looking around for new and creative ideas as well as odds and ends. The guest bedroom is a little on the girly side for Chris taste, but the room started with the bedding and has evolved around it. We were out in the burbs last weekend visiting with Chris 90 year old grandmother and she had a pile of furniture that she was getting rid of. We took one glance at the desk (which turned out to be Chris mothers childhood desk) and thought, now this will work perfectly in the guest room. With a little paint it would be good as new. Now here's where the Old to New.... But then old again comes into play. After it was painted I was then going to distress it, to keep in theme with the "Country French" look. I then went to the local Salvation Army and found a ladder back chair for $2. Its amazing the amount of stuff you can find in that place. With a little love, and a fresh coat of paint you have yourself a new treasured piece. So in this blog I walk you through the process in how to distress. Once again it really is easy!!!
                                                      
                              
Keep in mind its a work in progress but its an up to date "after"

Before


Items Needed:

-A piece of furniture
-Furniture paint (I used oil based because I wasn't sure if the original coats were water or oil)
-Paint Brush
-Drop Cloth (to cover the floor from getting paint on them)
-A hammer or chain, or heavy tool that will leave dings and dents
-Old English (love this stuff)
-Cloth/Wash Cloth/Old Shirt
-Paste Wax (optional)

I forgot the Old English in this Photo

The Desk - Before

Yikes.....

First coat of paint

Second coat

I waited for about 48 hours to let the paint really set in before I started the distressing process. This was hard for me because I like instant gratification!! Once the paint was fully dried and had plenty of time to set into the wood, I went to town. And if for any reason your having a bad day, this is a great way to get your frustration out :) 

Take the chain or hammer or wrench and slam it on to the wood to create dents and dings into the wood

Once you have gotten the piece of furniture to the distressing level of your preference, break out the Old English 
Add a generous amount of the Old English to your cloth

Rub it all over the piece, even getting it in the cracks and crevices. This is really what gives the piece that aged look. Once you have covered the piece with the Old ENglish, flip over your cloth and buff it out so that it has slightly given the paint a not so "stark" look, but has really gotten into those dents and dings. Make sure you have buffed it all off. And that's it..... Old to New....But then Old Again
The chair was distressed too
Fenwicks (my dog) tail sneaked in this photo

Side Note: The Paste Wax,  this you can apply between the hammer stage and Old English stage to the dents and dings. Just rub a little on the areas and then continue on to the Old English


Thursday, October 20, 2011

The wreath needed a little help......

So, my burlap wreath ( I blogged about this a couple blogs ago) was hung on the front door, and it looked great. But every time I would walk up the stairs to my front door I would think.... it needs something. So I thought how can I spice it up? I thought of things I had around the house to make it a quick fix, and this is what I came up with.

FABRIC FLOWERS.
A great thing about these fabric flowers is that they are easy, and very universal. You could make a hairpiece, a ribbon belt or even add them as a broach or accessory to a bag or present.

Materials:
* Any old piece of fabric, scarf, shirt.....anything
* Glue Gun or Fabric Glue
* Scissors
* Thread and needle
* Beads ( I took an old earring)
* Wire

Step 1:
Cut your fabric about 1 or 2 inches vertically to make a long strip

Step 2:
Tie a knot at one of the ends
Step 3:
Dab a little glue on the side of the knot

Step 4:
Twist the fabric as you rotate it around the center the the knot, while making sure the first round about covers the glue
Step 5:
Dab a small amount of glue every 1/4" so that the fabric stays in place
Step 6:
Once the flower is to the size you would like it, simply cut the fabric and tuck the remainder on the back side. Give it one more dab of glue to secure the end.

Step 7:
Then I took my old earring and broke off the beads. Thread the beads onto the center of the flower for a finishing touch


Step 8:
Take a piece of wire and thread it through the back for simple attachments such as a wreath


                                                Who knew an old scarf could look so good!

Homemade Laundry Detergent..... Couldn't be easier

This recipe for both powder and liquid detergent could seriously not be any easier!!! And not only is it easy but its cheap too!!!

The Recipe:

* 1 Bar of Soap ( Yardley with Lavender would have been my first choice but we didn't have any)
* 1 Cup of Borax
* 1 Cup of Washing Soda

                                         Notice the water jug..... Thats for the liquid detergent

Powder Detergent:
Step 1: Grate the bar of soap
Step 2:
Pour in 1 cup of Washing Soda & 1 Cup of Borax
Step 3:
Thoroughly stir the ingredients together for 5 minutes and ENJOY!!!!
Lavender is always a nice touch

I simply put the liquid detergent into the water jug, and the powder detergent into a mason jar. With a little glue I put the labels on and within 20 minutes I had homemade detergent 


Monday, October 10, 2011

Its amazing what a little burlap can do......

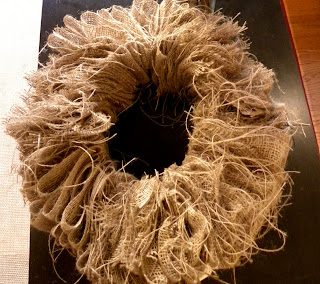
The Burlap Wreath...... I have been seeing these all over the Internet. And everyone who blogs about them makes the building process look so easy. Well let me be the next..... It is INCREDIBLY easy!!! From beginner DIY'ers to full fledged Martha Stewart's, it is cheap, easy, fun, and takes very little time. But the best part about this simple wreath is you can make it fit any interior/exterior by just adding a little bit of you. From ribbon, to flowers, or holiday themed ornaments, just about anything works well on this simple but unique looking wreath.
I had a couple of these items, so my total cost was about $8. However if you were to have none of the above you are roughly looking at a total cost of $20.

Materials needed:
Burlap
Scissors
Measuring Tape
Wire (Aluminum Wire with the wire cutter attached) 
Ribbon (optional, my choice of decoration)
Glue Gun (optional, for attaching decoration)


Step 1: Take the aluminum wire and bend/mold it into the desired diameter of the wreath.  Twist the ends together. Not too tight.... they will be "un-twisted" once the burlap is ready to go on. (please excuse the image of the wire. It was not easy to capture) :)

Step 2: Unroll the burlap out on a large surface.  Cut lengthwise:  4" stripes (they do not have to be perfect)


Step 3: Fold the 4" thick bands into accordion like form until you have completed the entire band

Step 4: "un-twist" the aluminum wire frame for the wreath that was set aside.  Simply take one of the wire ends and string through the center of the burlap. Repeat this process
Step 5: Repeat until the entire wire is packed with your 4" burlap strands.
Step 6: Make sure the burlap is packed tight. Twist the ends back together at the top, and play with the burlap so that it covers all of the wire that may be exposed.

Step 7: I had no idea how heavy the burlap was until all said and done. So to ensure that the burlap does not make its way down and sag I took little pieces of the wire and twisted them every 4-6" around the entire aluminum frame for support. It worked perfect!!!
Step 8: With a little ribbon and a glue gun, VUALA!
I tied the ribbon to the back side of the wire on both ends to balance the weight of the wreath 

One of the best parts to creating this project is that nothing has to be perfect in the building process. However in the end it looks perfect